
The Ultimate Guide to Cleaning Your Keyboard and Mouse
In today’s tech-driven world, our computers are at the center of work, entertainment, and communication. But while we upgrade our software and hardware regularly, we often overlook one crucial aspect: cleaning and maintaining our peripherals, especially the keyboard and mouse. Over time, these devices collect dust, debris, oils, and bacteria. This buildup not only affects performance but can also pose health risks.
In this comprehensive guide, we’ll walk you through everything you need to know about cleaning your keyboard and mouse, from the tools you need to deep-cleaning steps and maintenance tips to keep them in top condition.
Why Cleaning Matters
1. Health and Hygiene
Studies have shown that a keyboard can contain more bacteria than a toilet seat. Why? Because we often eat at our desks, touch our faces, sneeze, or cough, then return our hands to our keyboards without washing. These habits introduce microbes that thrive in the nooks and crannies of your keys. If you share a keyboard or mouse with others, the risk of germ transfer increases significantly.
2. Improved Performance
Dirt and debris can prevent keys from pressing smoothly or cause a mouse to skip or lag. Regular cleaning ensures that keys respond properly and that your mouse tracks accurately, which is essential whether you’re working, gaming, or casually browsing.
3. Device Longevity
Dirt, crumbs, and skin oils can degrade materials over time. This can lead to discoloration, stickiness, and even internal damage. Regular cleaning can add months, even years, to the lifespan of your devices.
4. Aesthetic and Professionalism
A clean workspace, including tidy peripherals, presents a professional image and feels more pleasant to use. Whether you’re in a shared office or working remotely, keeping your equipment clean reflects well on your habits and attention to detail.
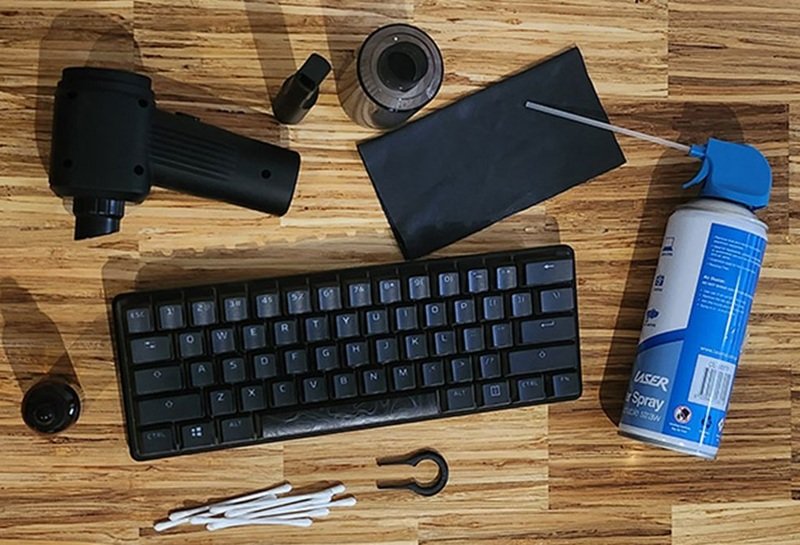
Essential Tools and Materials
Before you start cleaning, it’s important to gather the right supplies. These will help you clean effectively without damaging your devices.
-
Microfiber Cloths – Soft, lint-free, and non-abrasive.
-
Isopropyl Alcohol (70% or higher) – Effective at disinfecting and safe for electronics.
-
Cotton Swabs or Q-tips – For cleaning tight spaces between keys and buttons.
-
Soft-Bristled Brush – To remove debris from cracks and crevices.
-
Compressed Air Can – Blasts dust from hard-to-reach areas.
-
Mild Dish Soap and Warm Water – For cleaning removable keycaps or mouse shells.
-
Keycap Puller (optional) – Makes removing mechanical keyboard keys easier and safer.
-
Toothpicks – For digging out stubborn grime.
-
Small Bowl or Container – For soaking components like keycaps.
General Safety Tips Before Cleaning
-
Turn off your computer before disconnecting any peripherals.
-
Unplug wired keyboards and mice; remove batteries from wireless ones.
-
Never apply liquids directly to your devices.
-
Let everything dry completely before plugging it back in.
Step-by-Step: How to Clean a Keyboard
1. Basic Surface Clean (for quick maintenance)
This method is suitable for weekly or bi-weekly cleanings.
-
Unplug the keyboard or turn it off.
-
Shake the keyboard upside down to dislodge crumbs and loose debris.
-
Use a compressed air can to blow out remaining dust between keys.
-
Dampen a microfiber cloth with isopropyl alcohol or water (not soaking wet).
-
Wipe down the surface and sides of the keyboard.
-
Use a cotton swab dipped in alcohol to clean between keycaps and along edges.
2. Deep Clean (mechanical or removable-key keyboards)
This process is ideal every 2–3 months or after heavy use.
-
Remove the keycaps using a keycap puller.
-
Soak keycaps in warm water mixed with a few drops of dish soap.
-
While the keycaps soak, use a soft brush to remove debris from the keyboard base.
-
Use compressed air to blow out fine dust from between switches.
-
Lightly moisten a microfiber cloth with isopropyl alcohol to clean the surface and switch tops.
-
Rinse the keycaps and let them dry completely before reinstalling.
3. Cleaning Non-Removable Keyboards (e.g., laptop keyboards)
-
Use compressed air to clean out dust from under the keys.
-
Lightly dampen a microfiber cloth with isopropyl alcohol and wipe the keys.
-
Use cotton swabs to clean between and around keys carefully.
How to Clean a Mouse
1. Optical or Laser Mouse (External Clean)
-
Unplug or power off the mouse.
-
Use a microfiber cloth dampened with isopropyl alcohol to wipe the top and sides.
-
Clean around the buttons and scroll wheel with a cotton swab.
-
Flip the mouse and clean the bottom, especially the sensor area, using a dry cloth.
-
Ensure the mouse feet are free from dust to avoid tracking issues.
2. Deep Clean (for dirt inside or sticky components)
Some mice, especially gaming mice, allow partial disassembly.
-
Carefully open the mouse casing (check manufacturer instructions).
-
Clean the internal components gently with a brush or compressed air.
-
Avoid touching the circuit board directly.
-
Use a dry microfiber cloth to wipe the inside surfaces.
-
Reassemble and test functionality.
Disinfecting Your Keyboard and Mouse
Disinfection goes beyond cleaning. Use this routine during flu seasons or shared workspaces.
-
Use a 70% isopropyl alcohol solution.
-
Apply the alcohol to a cloth, never directly to the device.
-
Wipe down all surfaces that are frequently touched.
-
Allow surfaces to air-dry completely.
Note: Avoid using bleach or products containing ammonia, as these can damage plastic components.
Read More: Windows 11 Power Features: 6 Tools You Can’t Ignore
Maintenance Tips for Cleaner Peripherals
To reduce the frequency of deep cleans, implement the following habits:
-
Wash Your Hands – Always before using your computer, especially after meals or outdoor activities.
-
Avoid Eating at Your Desk – Food crumbs are a major source of keyboard mess.
-
Use Keyboard Covers – Silicone covers are inexpensive and protect against spills and debris.
-
Wipe Down Weekly – Make it a routine to clean your peripherals once a week.
-
Store Properly – When not in use, cover or store your keyboard and mouse in a dust-free area.
Troubleshooting Common Problems
Sticky Keys
-
Often caused by spills or buildup under the key.
-
Remove the keycap (if possible) and clean underneath with alcohol and a swab.
-
In stubborn cases, soak the keycap and clean the switch with a brush.
Mouse Not Tracking Properly
-
Check for dirt near the sensor or on the mouse pad.
-
Clean the sensor with a microfiber cloth.
-
Try using the mouse on a different surface to rule out pad issues.
Keyboard Not Responding After Cleaning
-
Ensure the keyboard is completely dry before reconnecting.
-
Test with another computer to rule out port issues.
-
If problems persist, a key switch may be damaged or the internal circuit affected.
Cleaning Special Cases
Wireless Devices
-
Always remove batteries before cleaning.
-
Ensure no moisture enters the battery compartment.
-
Let everything dry thoroughly before reinserting batteries.
RGB or Backlit Keyboards
-
Clean carefully around lighting components.
-
Avoid moisture buildup, especially near power circuits.
Laptops
-
Clean the keyboard and touchpad gently.
-
Avoid getting liquid near the screen or into side vents.
How Often Should You Clean?
-
Light Surface Cleaning: Once per week
-
Deep Cleaning: Every 1 to 3 months
-
Disinfection: After illness or frequent use by multiple users
-
Mouse Sensor Area: Monthly or as needed
-
Keycap Soaking: 2–4 times a year
Final Thoughts
Cleaning your keyboard and mouse might seem like a small task, but it pays off in performance, longevity, and hygiene. By integrating regular maintenance into your routine, you’ll not only keep your devices in top shape but also enjoy a healthier, more pleasant workspace.